
[Read the Disclaimer first!]
LEDs (Light Emitting Diodes) run at a somewhat specific voltage and a very specific current. If the current is exceeded for any significant time (more than a fraction of a second), then it suddenly becomes a Smoke Emitting Diode and fails. So the current needs to be limited. Ideally with a constant-current power source, but those are rather costly (compared with the LED itself) and difficult to construct. The solution is to limit the current to a reasonable level by using a resistor - this is not an ideal solution, but an acceptable one - it burns some power into useless heat.
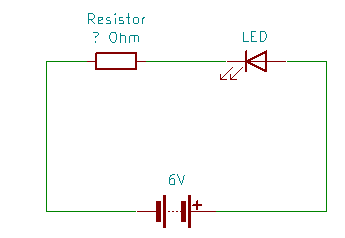
On the left you see the basic circuit for driving a LED.
LEDs are normally specified to run at a range of (forward) voltages and a specific maximum (forward) current. They can be run at a lower current/voltage, but if the specs are exceeded they'll burn out. So how to calculate the correct resistance?
Let's start with Ohm's law:
R = U / I
Resistance equals the voltage dropped by the device divided by the current flowing through it. Nice.
...but, but we have two devices here - a LED and a resistor - how about now?
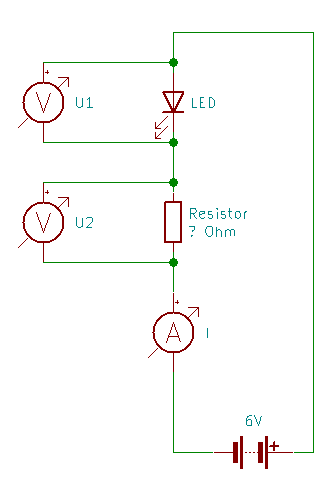
Simple (see circuit diagram right) - two devices in series each "consume" a part of the voltage that
corresponds with the relation of their resistance and both share the same current.
LEDs have an almost fixed voltage drop - the forward voltage, which only changes very little with the current flowing through them (at least when working near efficiency). This forward voltage is usually specified on the datasheet as a range. Why a range if it is fixed? Production tolerances make it impossible to have a perfectly fixed voltage, but the range should tell us what is safe.
Let's do an example: let's say our LED has a forward voltage of 3-3.4V and a current of 20mA. Our power supply (battery pack) has a voltage of about 6V. We'll do the calulation for a relatively safe forward voltage of 3.2V. That means in the circuit diagram on the right the LED's voltage is 3.2V and the resistors is 2.8V with a current of 20mA or 0.02A. Now it is almost trivial to calculate the size of the resistor:
U1 = 3.2V

U2 = 6V - 3.2V = 2.8V

I = 20mA = 0.02A


R = U / I

R = 2.8V / 0.02A = 140Ω
A resistor with 140 Ohms exists, but only with tolerances of 2% or 1%, which makes it a bit more expensive than necessary. The next one up is 147Ω with 5% tolerance, which should be okay for this application and is usually reasonably cheap - if you buy a few hundred or if it is part of a standard kit for tinkerers the price per resistor should be between 1 and 4 cents (US or EUR).
So here a few rules for calculating resistors for LEDs:
But what to do if you have an LED and no idea what type it is?
You should get a LED tester - this little device is helpful whenever you are working with LEDs, since it helps you check that the LED is working at all (a surprising number of LEDs are faulty). LED testers usually let you chose the forward current and then automatically produce enough voltage to drive the LED. You can use this in several scenarios: